Do you want to start vlogging?

Posted on 16th March 2018

If you’re considering to start vlogging don’t be put off by thinking that you must use professional cameras and equipment to generate great quality video content.

The holy grail of social media success is an engaged audience. One of the ways to generate meaningful interactions and maintain engagement is to achieve that sought-after “self-shot” look and feel. Thumb-stopping content will ooze authenticity.

To start with, don’t feel bad if your video is not looking as sharp as the brands you follow on Instagram, you would never guess the level of production that goes into producing some of their content.

A couple of years ago, we filmed various very successful vloggers such as Dina Tokio using a Canon DSLR 7D. Today there are plenty of more options at affordable prices. Here’s a couple you could try [this is not an #ad so we are not getting paid for these mentions]: Panasonic Lumix GH5, Canon 5D [a classic!] or Sony A7s [particularly good if you think you’ll be filming in low light conditions].

Luckily, mobile phones cameras are getting better literally every day.

Not long ago we ran a few tests on the iPhone X and the quality is just astonishing. It shoots 4K 60fps and if your content is for social media only, then this is indeed an option. Please bear in mind that results won’t be as nice in low light though, so be mindful of lighting conditions.

Yes, you’re probably wondering about that one other brand: It’s very often that we get asked about the capabilities of a GoPro. We love those little cameras! However, with GoPro, it’s important to use top of the line kit because the resolution upgrades drastically with each new model. The most recent ones, also have image stabilization which is a huge advantage when filming on the go.

Whatever you are using, and before you rush to buy new kit, include lighting in your filming bag. You will see an instant boost in the quality. Get the lighting right first. You can thank us later 😉

Click here to check our blog about basic lighting tips and tricks

And remember, you are only going to improve if you keep filming every week.

Quickly filming an event video

Posted on 14th March 2018

One of the main reasons people keep using their mobiles to film and edit videos is because deliverables can be turned around very quickly.

We filmed this short clip on an iPad Air 2015 and edited it on the same device. The key, as with all event filming, was NOT to over film. Our advice is to capture what’s important and not to feel bad if you cannot get absolutely all the nice bits of the event. A video is meant to highlight the moment and you definitely don’t want to spend hours and hours editing a short social media clip.

We filmed using the native iPad camera and edited the footage using a (since discontinued) app called CLIPS [apparently it was bought off by Google a couple of years ago and whilst the version we used for this no longer exists, there is now a native iOS app also called Clips with video filming & editing capabilities]. There are loads other options out there. One of the easiest to use is probably VidClips. Give it a try, it has themes, FXs and you can add text on top of your videos.

After filming a bit at each stall, I started editing straight away whilst on the way back to the office. The journey back was a 1-hour long tube ride and by the time I arrived at my destination, the movie was already uploading to Facebook. Nice and easy. The fresher the content the better the results and the more videos you can produce to boost your social channels.

We deliver workshops to teach you how to improve your filming skills so you too can become a social media videographer. Click here to find out more.

In the meantime, keep practising. Asking questions from day one is vital to discovering your strengths and working on any weaknesses.

https://www.facebook.com/quickbrownfoxuk/videos/1240485715976842/

7 top tips to create iPhone videos

Posted on 7th March 2018

Content is king but context is key. Once you’ve decided what you want to film, have a look at these killer tips to ensure you produce top quality iPhone videos regardless of the camera you’re using:

1- WIPE that lens:

This may sound silly but loads of times blurry iPhone videos happen because of a dirty lens. Make it a habit to clean your camera lens with a standard glass cleaning cloth and you’ll see the difference.

2- Keep it STEADY:

Make sure you hold your phone steadily and with both hands. If this is not practical maybe try resting it on a surface or consider buying a small tripod or stabiliser. The Manfrotto mini tripod is not expensive at all at £30 (including the must-have clamp to fix our phone).  We’ve been using ours for over 3 years and it’s never let us down. It’s not bulky, it takes 1 second to mount your phone on it and having a big name brand behind it makes it super reliable.

3- Consider the LIGHTING set up:

Most places have warm lighting which tends to have a yellow tint to it. You want to film under ‘daylight’ light which has a more blue-ish tint and on film looks closer to natural light. You can achieve a natural light look artificially by swapping the bulb in your desk lamp or you can get an LED panel that can be adjusted to lots of different scenarios.

4- Film in 4K:

Most users don’t know this mega tip, but it is possible to FILM 4K quality iPhone videos. Indeed if you have an iPhone 6 or newer your device is capable of filming videos in 4K.  It’s not quite as simple as just opening up your camera and pressing record. You will need to tweak some settings, but don’t worry, it’s not too complicated. Just go to Settings > Camera, tap either Record Video or Record Slow-mo, and select your preferred resolution from the listed options. Choose from various options from HD to 4K and even change the frames per second to give you the smoothest video with the highest number of pixels.

5- Invest in a few APPS:

Your iPhone videos can be hugely improved by using third-party apps. There are a few good free ones but consider investing in paid for apps as well for better results. We use and recommend iMovie for editing on the go, Hype Type to add animated texts to your videos and Stop Motion Studio for well… doing those clever stop-motion clips where inanimate objects seem to have a life of their own.

6 – SOUND:

This is a biggie. Spot on sound is crucial, so unless you’re planning to overlay a music track or voiceover on top of your video, try your best to keep environment noise to the minimum. In reality, the phone’s built-in mic is not great, so maybe consider investing in an external recording device or a directional microphone. If you’re shooting iPhone videos, we use and recommend the Rode SmartLav. Just search online for it, it shouldn’t break the bank at roughly £50.

7 – Consider VERTICAL:

Up until a year ago horizontal filming was a must since output channels had either a square or 16:9 ratio. Filming a video whilst holding your phone in a vertical position always meant ending up with those awful black square to either side of the video when watching on a bigger screen or after uploading to youtube. Nowadays with Instagram and FB stories huge relevance, we’d say it will ultimately depend on where the video is going to be published: If you’re filming for YouTube or Facebook, stick to holding your phone horizontally, if you’re creating an Instagram story, play around with vertical videos. Maybe you’re wanting to make a square video. In this case, you may want to shoot horizontally but leave some room on either side to allow for the cropping that will ensue.

8 – Bonus TIP:

Check out our friends over at Avocado Social where they share their 3 top tips for creating attention grabbing social media video.

As you can see we’ve gone back to the beginning: Planning is key! Before pressing that record button, think exactly what you want to get out of your video and where and how and then go from there. If you’re stuck, give us a ring, we’re always happy to help.

Or come to one of our workshops, full information and booking links are in the training section of our website

Have fun making videos!

So you want to start a YouTube channel…

Posted on 22nd February 2018

If you are running a business in 2018, you will already know there is a huge potential audience out there ready to see what you have to offer and how it can add value. Openly sharing your skills, knowledge and experience creates a connection with your community. Such a connection will give you leverage to sell your products and services.

The best way to engage and connect with your audience is through video. It’s very important to post unique, good quality, to the point videos. Having filmed and edited video content for hundreds of clients over the years, we have compiled a few tips to nudge you in the right direction and give you a strong starting point towards a successful vlog or YouTube channel.

Quality content:

High-quality videos get more views on YouTube. Nowadays there is no excuse for poorly filmed videos with terrible sound. Using the right filming and editing kit you will get:

  • Good lighting: It’s not necessarily about having expensive lights, but good lighting is crucial.
  • Reduced noise: A good quality microphone and a quality editing program that will allow you to filter out background noise for much clearer sound.
  • Crisp images: Again, it doesn’t have to be an expensive camera, but filming in HD at least will provide a higher quality video

Music

If you want to add music to your videos make sure you own the rights to use that particular track or at least check that the track is not copyrighted. Copyright violation is a serious issue that could result in a disabled video, a banned channel, and even legal action from the copyright holder. YouTube has a very convenient catalogue of music that is free to use, all tracks have been pre-approved and there’s no need to worry about copyright claims.

Film horizontally

Vertical videos are all the rage on social media these days. Not on YouTube. Think of YouTube as you would of a TV channel. There are no funny blank spaces on the sides of the screen of a TV show. When you film horizontally you get better use of space. There is more room on the sides and less wasted space above your head.

Top tips to look great on camera

Posted on 5th December 2017

Appearing on camera can be really tricky for non-actors. It can actually be really uncomfortable!

So we thought we’d share with you our top basic tips to help you feel at ease from the word ?ACTION!

  • Keep it light: It will help the final video look much better. Like in life, don’t take anything too seriously.
  • SMILE! It might feel awkward at first but don’t let it put you off.
  • It WILL take multiple takes. And that’s OK! Promise it will be all worth it in the end.
  • Would you run with your hands in your pockets? Nah you wouldn’t! It’d be silly, right? Well, same goes for being on camera. Find a comfy, natural position and relaaaax.
  • Bring a friend: our crew is mega friendly. All of them. But if you still think it’ll be intimidating feel free to bring someone to tag along. They’ll have the job of being encouraging and supportive.

Check out the video below and let us know what you think. We reckon these guys all look quite at ease!

The importance of lighting

Posted on 9th August 2017

When you’re watching a video it is really easy to take lighting for granted. That is if the lighting technique used has been successful.

Just as we often bang on and on about sound, lighting too should never-ever be overlooked. Even if your budget is tight we would always advise carefully considering your light set up.

Natural light is great, yes, but extra support lights can make or break your video.

Consider today for example. It was dull, wet, rainy (British summer eh!). Definitely, you would need extra light on a day like today, particularly if you are filming indoors.

Hold on, how about a sunny spells kind of day? Well, lighting then will be ever changing with clouds constantly blocking the sun and changing the light temperature and intensity.

Funnily enough, overcast weather makes for easier filming conditions than a super bright day.

Remember:

Lighting can help determine mood. Think thrillers and horror flicks. Those shadows playing mind tricks are everything, right?
Poor lighting will make for more expensive post production, more time in the editing suite. More importantly, imagine you have to suddenly go back out and film everything again. Now, that would be expensive!
At a professional level, one of the most popular lighting techniques is called the Three Point Lighting technique:

You have a key light/main light, placed to the side of the camera and lights the main subject.
A fill light or secondary light is placed opposite to the main light to help fill shadows cast by the key light.
Back Light: It is placed behind the main subject to add some space between the background of the scene and the subject and give a more 3D look on camera.
In our beginner’s workshops, we always discuss many alternatives to take advantage of available light when filming.

Get in touch if you would like to learn more.

7 tips to film with your mobile

Posted on 16th March 2017

Mobile phones are everywhere and they’re becoming more and more powerful by the day.

Now, just because you have a powerful camera it doesn’t mean every video you make will be top notch.

That shiny new iPhone 7, ok scratch that… that battered, smashed screen iPhone 5 will only get you great quality if you use the right technique and the correct tools to edit.

Practice makes perfect, read on for a roundup of 7 key points to consider when shooting video with your mobile:

1 Get ready to shoot: not only will you need a script or at least a pretty good idea of what you want to say on camera but remember to check you have enough batteries and storage space on your phone.

Keep it steady: Make sure you hold your phone steadily and with both hands. If this is not practical maybe try resting it on a surface or consider buying a small tripod or stabiliser.

3 Vertical? Really?: It will be very obvious once we tell you why, but just picture your TV… right, think about the screen or your TV, is it vertical or horizontal? Aha… well, just never, ever, ever, ever, EVER shoot vertical video. Just don’t. You’ll end up with those awful black square to the sides! Instagram has been putting us through our paces with insta-stories only being available in vertical mode. It really puts us off.

4 Don’t stand too far away: Try to position the camera close-ish to your subject, about 1 meter should do the trick, and remember the camera is to one side of the phone ?

5 Sound is huge: This is a biggie. Spot on sound is crucial, so unless you’re planning to overlay a music track or voiceover on top of your video, try your best to keep environment noise to the minimum. Your phone’s built-in mic is not great, maybe consider investing in an external recording device or a directional microphone.

6 Lighting is Critical: If possible try to shoot in natural light, mornings are usually best. Avoid pointing the camera directly at the window though or you’ll end up with just silhouettes. Play around with the focus and exposure… which takes us to the next point…

7 Apps: The iPhone camera can be hugely improved by using third party apps. There are a few good free ones but consider investing in paid for apps as well for better results.

How to ask for an estimate for video production and editing

Posted on 9th January 2017

Ever since we started The Quick Brown Fox Video Production we’ve received a steady stream of enquiries asking us to ‘quickly’ price a job and give a ballpark figure for filming and editing.

Although we have fixed rates it is best to spend a bit of time thinking about the final product in order to get things right from the start.

There are many factors affecting a filming or editing job, we need to consider equipment to be used on the day yes, but also man-hours during post production. … and who best to give a full brief than the client?

Some of these questions may or may not be relevant to your particular project and if there’s anything you don’t know we can offer advise, but as a rule of thumb the more information you can give us about your project the quicker and more accurate we will be able to price it.

? Can you briefly describe your idea for a video and how long you would like it to be?

? Do you already have a script or storyboard or concept we can work to?

? Have you seen videos you like similar to what you would like to do?

? Do you know how many filming days you will require?

? What type of content are we filming?

? Do you have a location in mind? Is it outdoors or indoors? A prefered date?

? We can work with a single camera or with as many as you need, can advise you on this bit as well.

? We can simply film and edit but can also offer full post production (voiceovers, grading, translations, captions), think you will need anything extra?

? How would you like your video delivered?

Please email us hello(at)thequickbrownfox(dot)co(dot)uk  for a no obligations chat and estimate.

A life without sound is like a Movie without Mr. Foley.

Posted on 4th May 2012

“A darkly funny but nightmarish scenario, a man wakes up in hospital with a group of sound artists soundtracking his life. Mr Foley is an award-winning short film directed by Dublin directing duo Mike Ahern & Enda Loughman aka D.A.D.D.Y. The film has been on the festival circuit for a while but has just premiered online for all to see, YAY!”

Ref. mrfoley.com 2012, Mr. Foley [online], Designing Sound, 1,
Available from: http://designingsound.tv/mr-foley/
[Accessed: 4.5.2012].

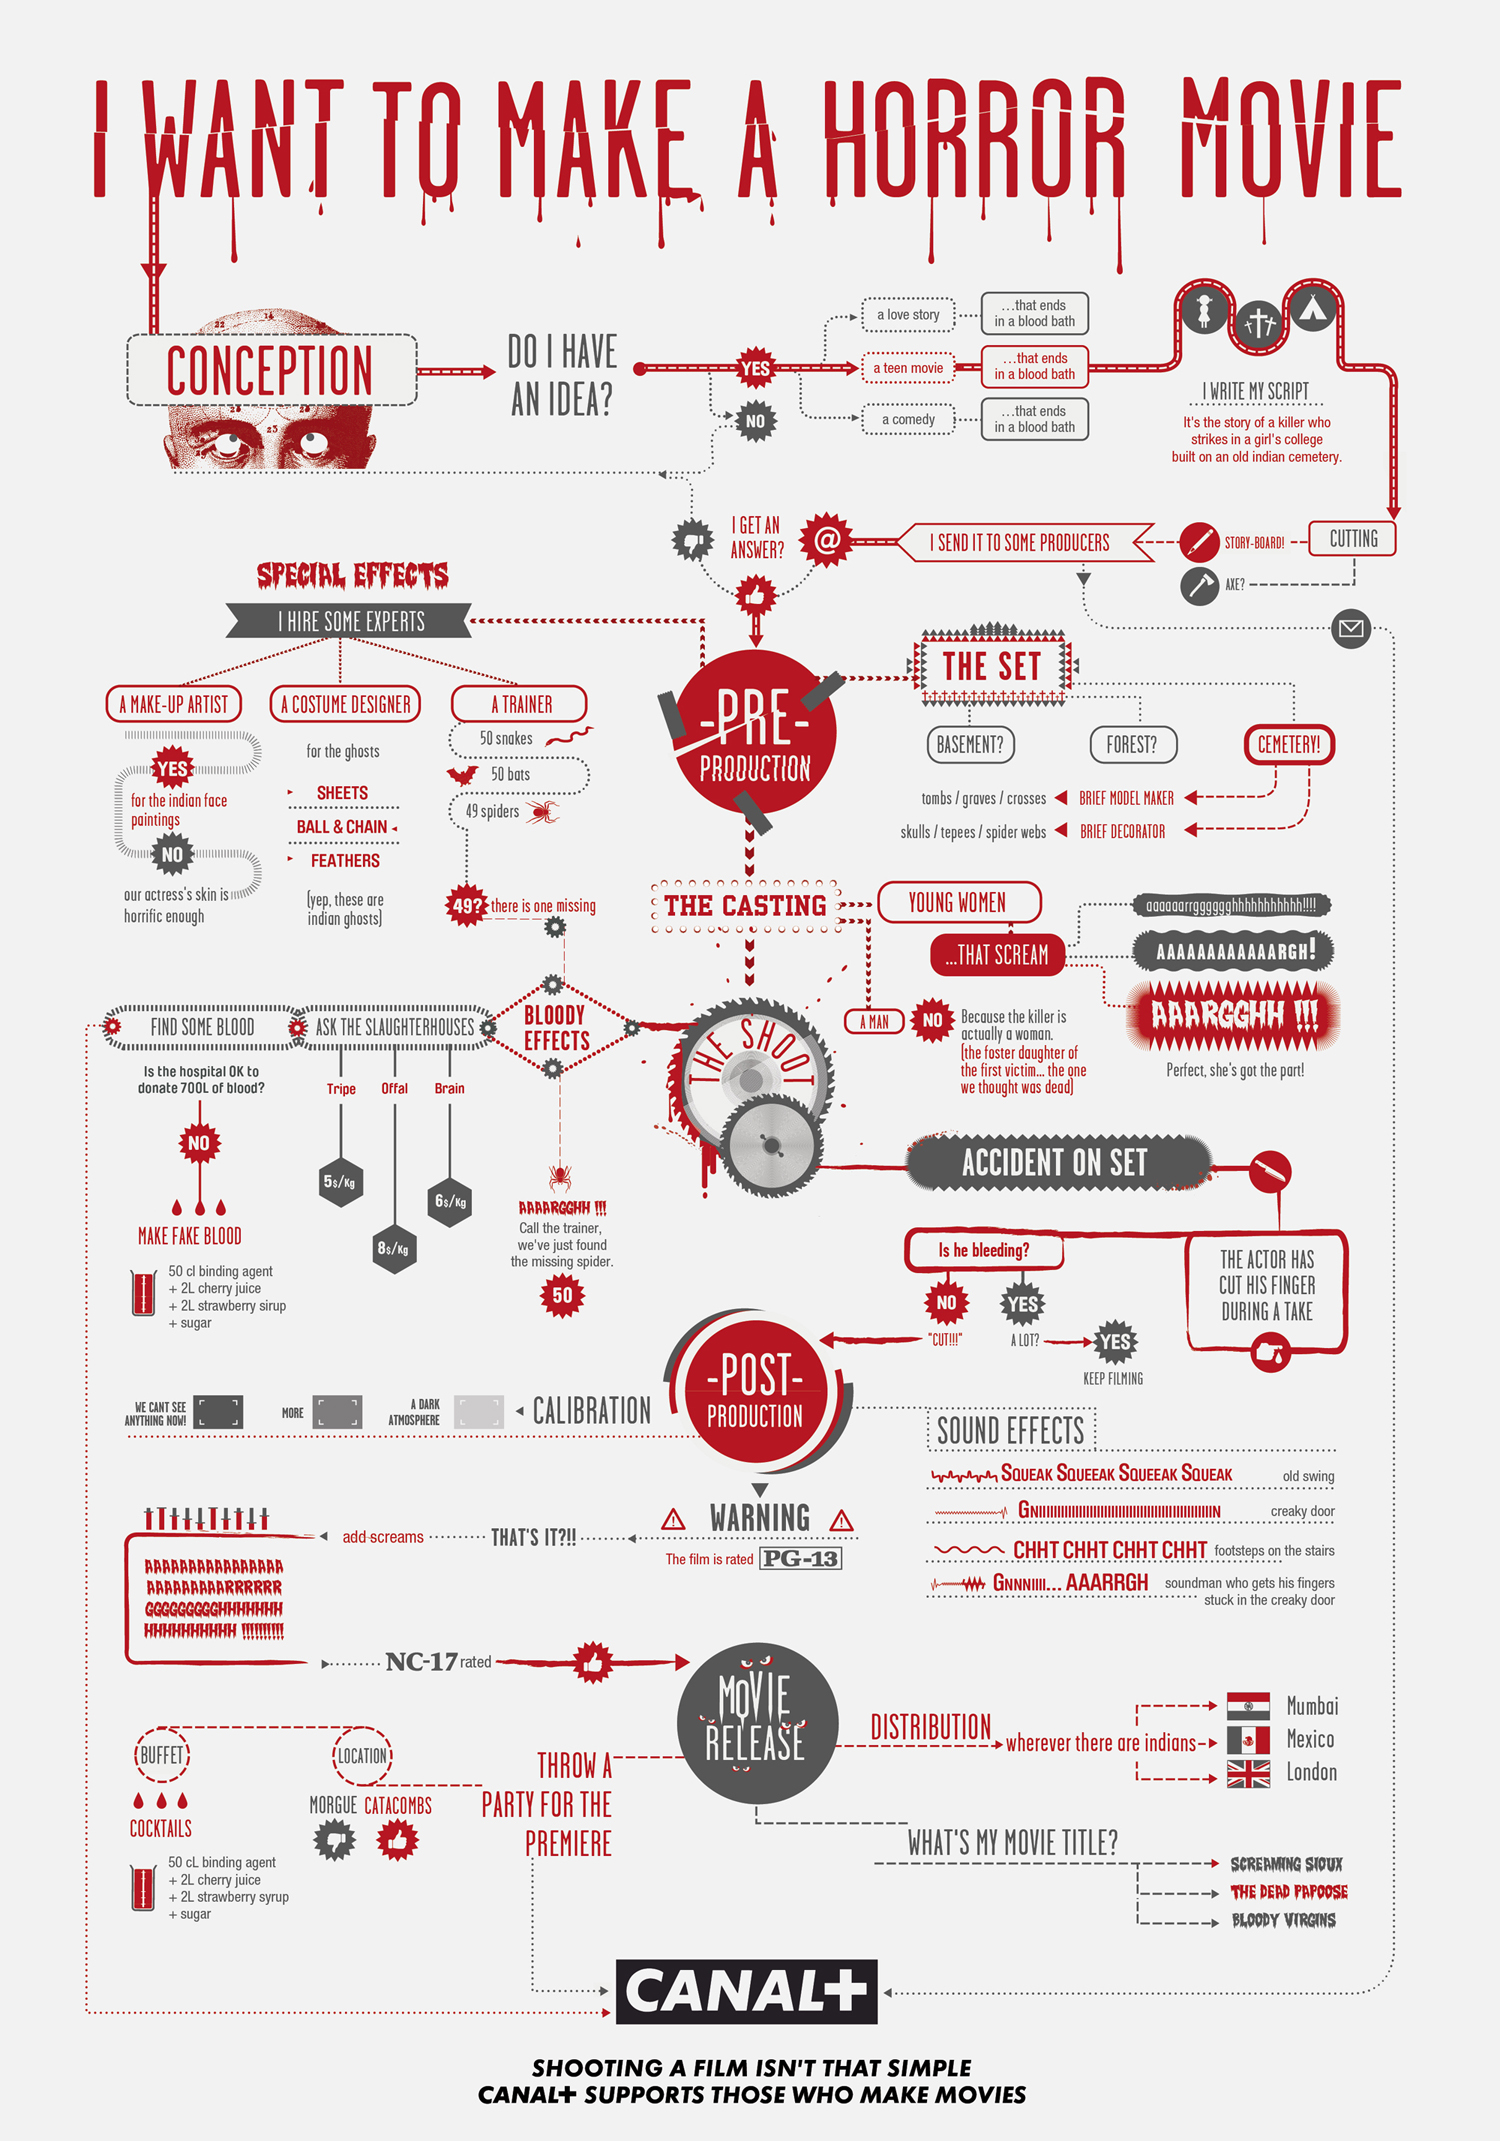
Would you like to make a Horror Movie?

Posted on 24th April 2012

THIS FRENCH FILM CHANNEL ISSUED A SET OF WITTY DIAGRAMS THAT BREAKS DOWN THE FORMULAS BEHIND THREE TYPES OF GENRE MOVIE.

Pavlus, J. 2011, Infographics of the Day: Flow Charts For Making Horror or Action Movies [online], Fastcodesign, 1,
Available from: http://www.fastcodesign.com/1663602/infographics-of-the-day-flow-charts-for-making-horror-or-action-movies
[Accessed: 22.4.2012].

Whatsapp